Before we begin:
The published (and slightly improved) project is posted as a demo at https://cluelabs.com/ai-chatbot-elearning-widget#section-ai-chatbot-demos (demo #2)
You can also download the .story file at https://storage.googleapis.com/us-east1-clabs-blog-images/0other/using-ai-to-generate-scenarios/AI%20LLM%20scenarios%20starter.story
Using AI LLMs to generate dynamic learning content, feedback, etc.
It’s easy to use AI tools like ChatGPT to generate a text paragraph and then use this text in a course authoring tool like Articulate Storyline. But this is just the tip of the iceberg of what AI can really do for elearning. This page provides a step-by-step guide on integrating and using AI LLM (Large Language Model) to do much more…
| What can you do? | Why should you do it? |
| Dynamically generate a new and unique scenario/assignment every time a learner accesses a slide. | You can give learners access to unlimited ever-changing scenarios to practice valuable skills multiple times and as often as they want. |
| Use AI to score learners’ submissions and provide instant feedback. | When a learner submits a typed response, an essay, or another type of unstructured submission, they can get instant feedback and recommendations. |
| Keep track of everything that both AI and your learners generate throughout the course. | As a learning administrator, you want to keep your hand on the pulse and be able to see what AI generates and how your learners respond to AI-generated scenarios. |
Dynamically generate a new and unique scenario/assignment every time a learner accesses a slide.
Creating an AI LLM connection for your Articulate Storyline project:
1. Go to cluelabs.com
2. Sign in or create a free account
3. Click the Chatbot tile
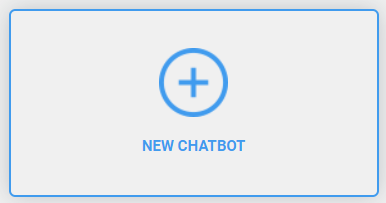
4. Click New Chatbot
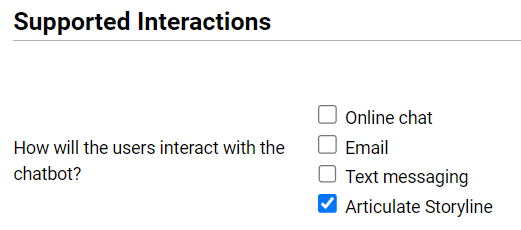
5. Under Supported Interactions, select Articulate Storyline
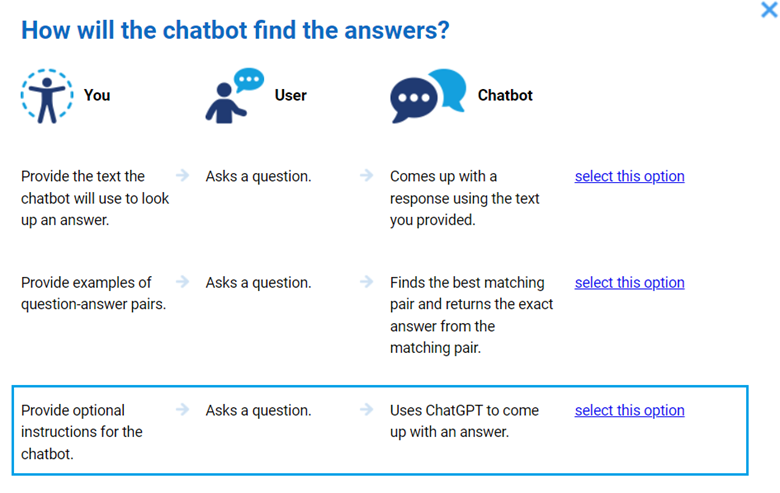
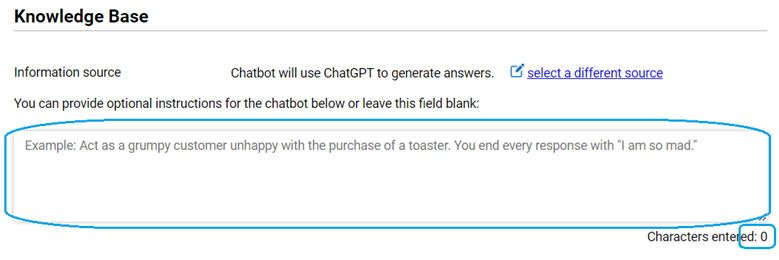
6. In the Knowledge Base section, click Select a Different Source

7. Select the third option to use ChatGPT
8. Make sure that the Optional Instructions field is empty and that the character count is zero
9. Click the Use the Chatbot tab

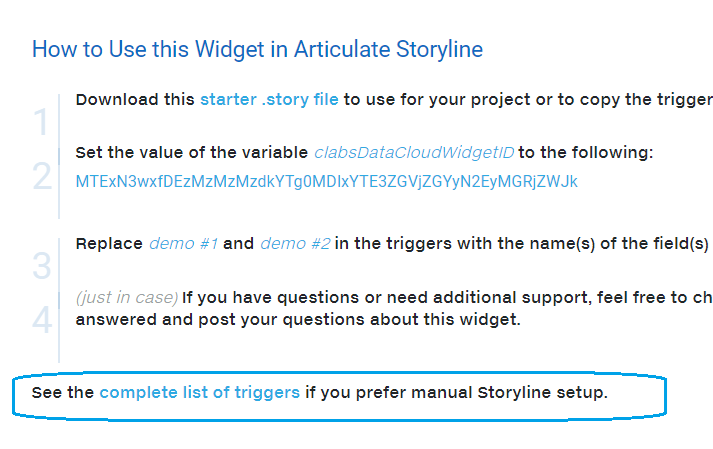
10. In the Storyline Widget section, grab the Widget ID and download the starter .story file

Setting up the AI LLM connection in Articulate Storyline:
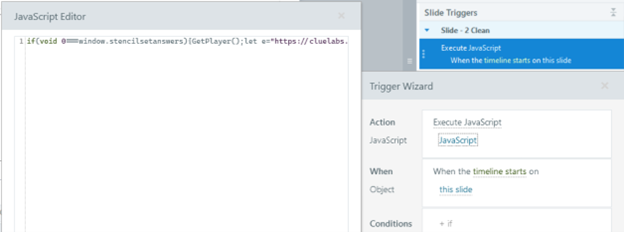
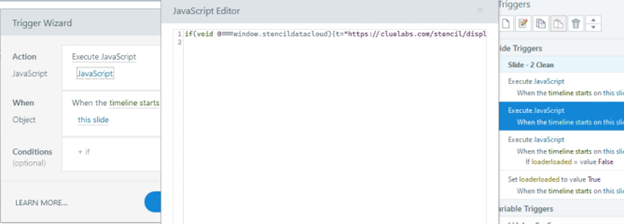
11. Open the starter .story file you downloaded and copy the JavaScript trigger on slide start; this code loads the LLM connection
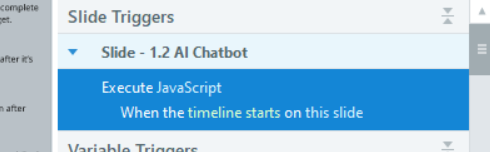
12. Recreate this trigger on slide Master – you need to ensure that this script completes before you attempt to use AI
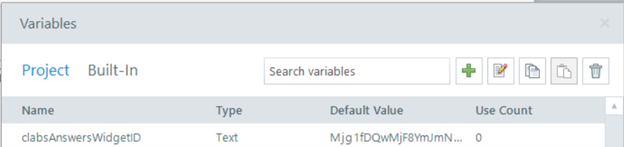
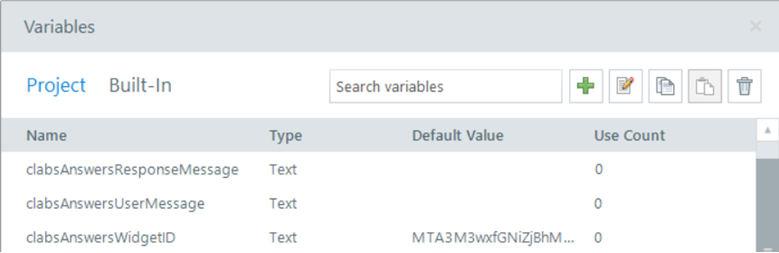
13. Create a variable clabsAnswersWidgetID and set the default value to the widget ID you received when you were setting up the AI connection
14. Create a variable clabsAnswersUserMessage
15. Create a variable clabsAnswersResponseMessage
Using AI to generate a new scenario on slide start:
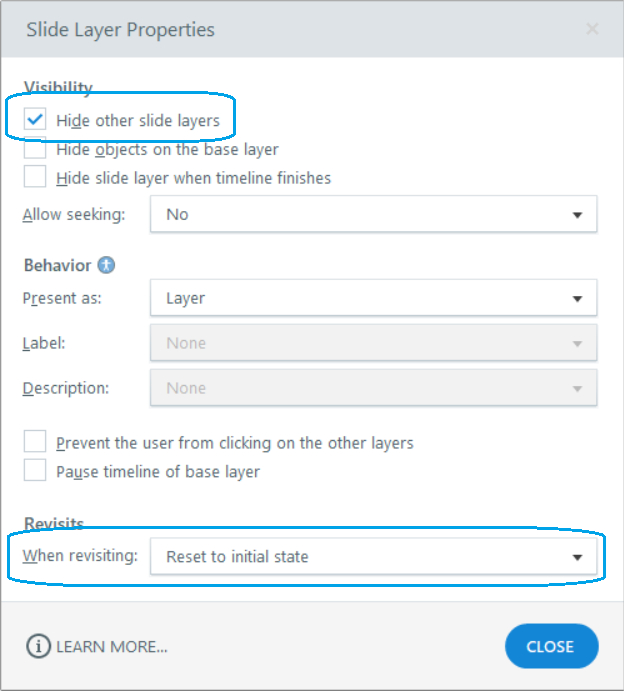
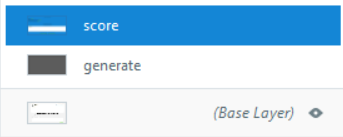
16. Create a new layer (we’ll call it generate) and make sure that it’s set to hide other layers and to reset to initial state when revisiting
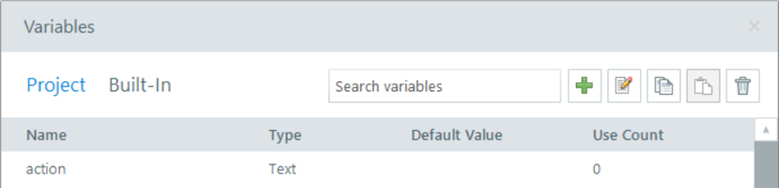
17. Create a new text variable and call it action
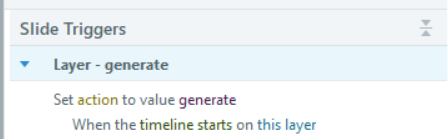
18. On the generate layer, create a trigger to set action to value generate when the layer starts
19. We will use the following prompt for AI to generate a new scenario
You are writing mock product reviews for customer service training. Come up with the following information:
– A customer name;
– A one-paragraph review the customer wrote after purchasing a consumer electronics product (must include at least one issue).
Respond with a valid JavaScript JSON object in the following format: {“name”:””, “review”:””}
20. Create a trigger to set the variable clabsAnswersResponseMessage to blank when the layer starts

21. Create a JavaScript trigger to execute when the layer starts
let player=GetPlayer();
let usermessage = 'You are writing mock product reviews for a customer service training. Come up with the following information: \n- A customer name; \n - A one-paragraph review the customer wrote after purchasing a consumer electronics product (must include at least one issue).\nRespond with a valid JavaScript JSON object in the following format: {"name":"", "review":""}';
player.SetVar('clabsAnswersUserMessage',usermessage);
clabsAnswersGetAnswer();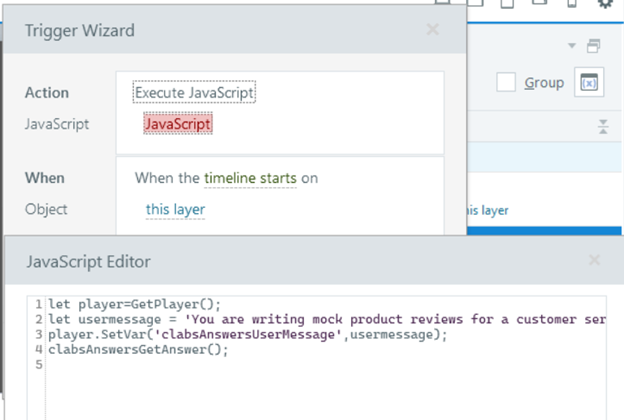
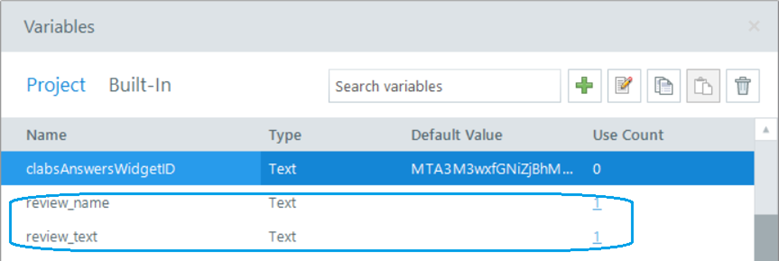
22. Create two new text variables – review_name and review_text
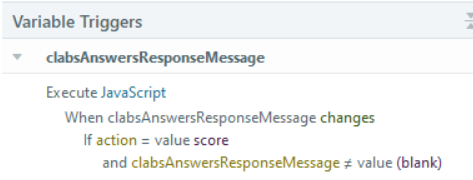
23. Create a trigger to execute when the variable clabsAnswersResponseMessage changes if the variable action is set to generate and clabsAnswersResponseMessage is not equal to blank (it will execute when the scenario generation completes)
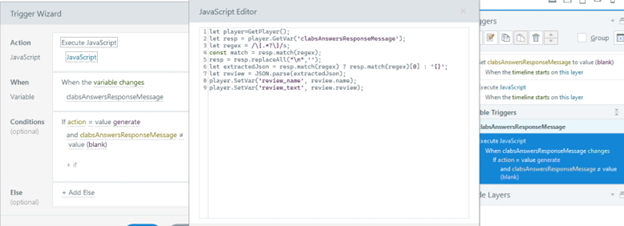
let player=GetPlayer();
let resp = player.GetVar('clabsAnswersResponseMessage');
let regex = /\{.*?\}/s;
const match = resp.match(regex);
resp = resp.replaceAll("\n",'');
let extractedJson = resp.match(regex) ? resp.match(regex)[0] : '{}';
let review = JSON.parse(extractedJson);
player.SetVar('review_name', review.name);
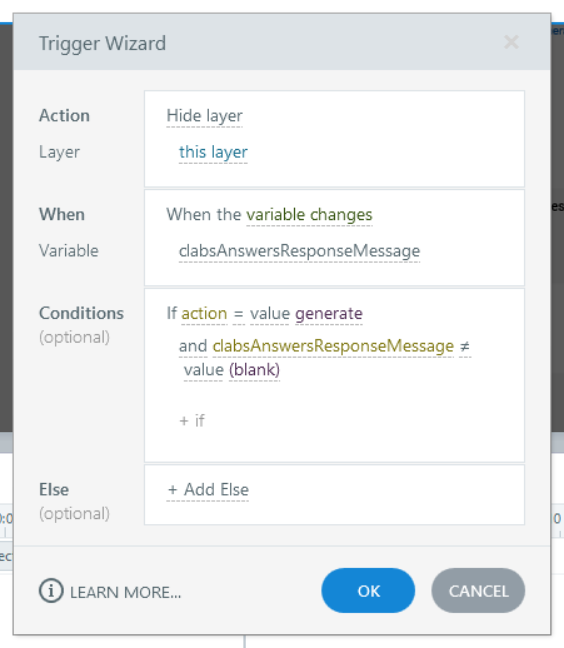
player.SetVar('review_text', review.review);24. Create a trigger to hide this layer when the variable clabsAnswersResponseMessage changes if the variable action is set to generate and clabsAnswersResponseMessage is not equal to blank (it will execute when the scenario generation completes)
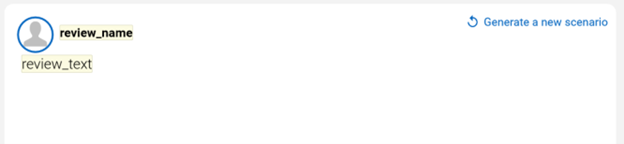
25. Return to the base layer of the slide and add variable references review_name and review_text where you would like to display the name of the customer and the product review
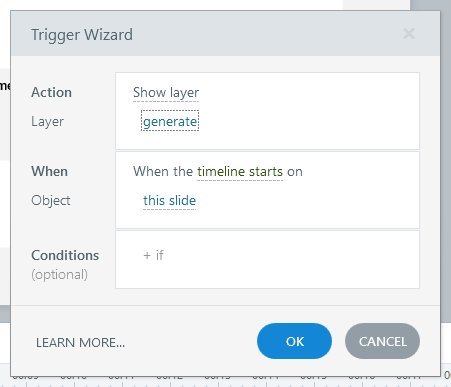
26. Create a trigger to show layer generate when the slide timeline on the base layer starts
Using AI to evaluate responses submitted by the learners:
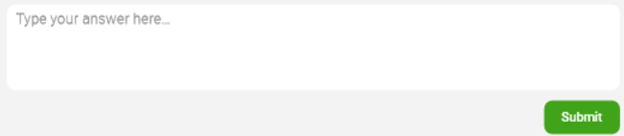
27. Add a text entry field for the users to type their responses and a Submit button
28. Add a new layer, we’ll call it score
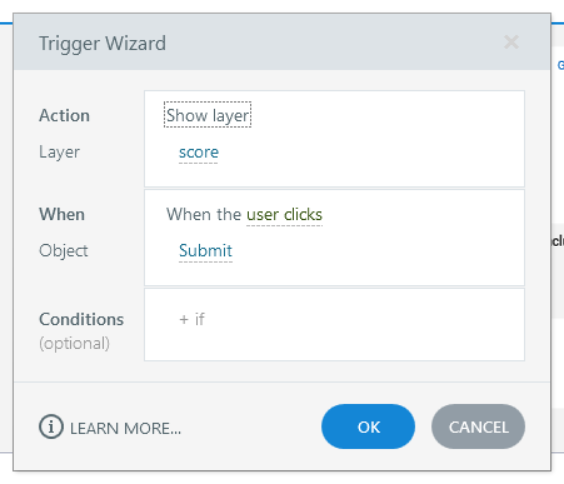
29. Add a trigger to show layer score when Submit is clicked
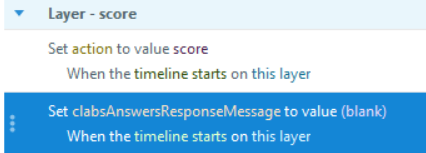
30. Add a trigger to set the variable action to score when the timeline starts on the layer
31. Add a trigger to set the variable clabsAnswersResponseMessage to a blank value when the layer timeline starts
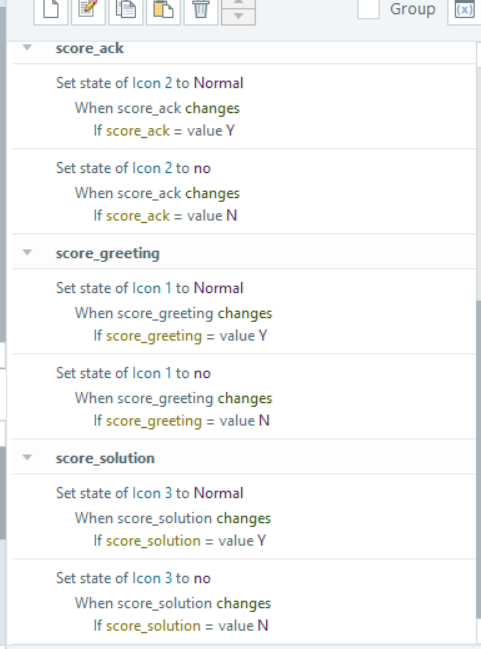
32. Add three new text variables – score_greeting, score_ack, score_solution

33. Add a trigger to execute JavaScript when the timeline starts on this layer
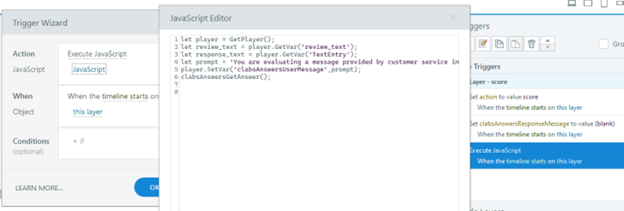
let player = GetPlayer();
let review_text = player.GetVar('review_text');
let response_text = player.GetVar('TextEntry');
let prompt = 'You are evaluating a message provided by customer service in response to this customer complaint: '+review_text+' \nAnswer Y for "yes" or N for "no": \nDoes the customer service message include a greeting?\nDoes the customer service message include an acknowledgment of the issue?\nDoes the customer service message offer a solution to address the issue?\nRespond with a JSON object in the following format {"greeting":"", "acknowledgment":"", "solution":""}\nResponse message to evaluate: '+response_text;
player.SetVar('clabsAnswersUserMessage',prompt);
clabsAnswersGetAnswer();
34. Create a trigger to execute when the variable clabsAnswersResponseMessage changes if the variable action is set to score and clabsAnswersResponseMessage is not equal to blank (it will execute when response evaluation completes)
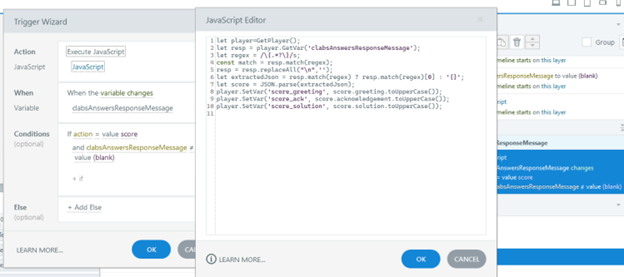
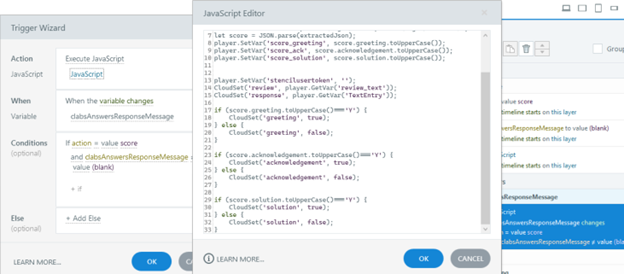
let player=GetPlayer();
let resp = player.GetVar('clabsAnswersResponseMessage');
let regex = /\{.*?\}/s;
const match = resp.match(regex);
resp = resp.replaceAll("\n",'');
let extractedJson = resp.match(regex) ? resp.match(regex)[0] : '{}';
let score = JSON.parse(extractedJson);
player.SetVar('score_greeting', score.greeting.toUpperCase());
player.SetVar('score_ack', score.acknowledgment.toUpperCase());
player.SetVar('score_solution', score.solution.toUpperCase());
35. The variables score_greeting, score_ack, score_solution will each contain one letter (“Y” or “N”) depending on the submitted response (whether the response included a greeting, whether it included an acknowledgment of the issue, whether it included a solution proposal)
36. You can add more objects to display on the layer in order to provide feedback to the learner based on the evaluation
Logging the text of the scenarios and responses to keep track of the performance of both AI engine and the learners who interact with the scenarios:
37. Return to cluelabs.com and log in
38. Select the Data Cloud tile on the dashboard

39. Click New Data Cloud Table
40. Leave the authoring tool as Articulate Storyline

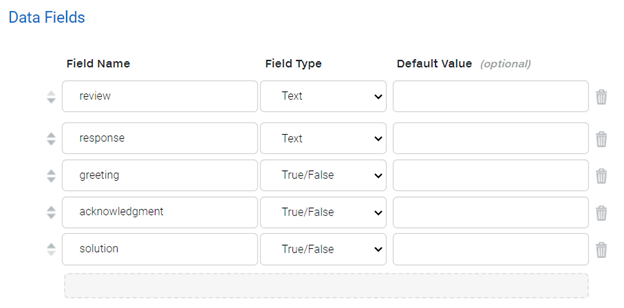
41. Under Data Fields, add fields review (text), response (text), greeting (true/false), acknowledgment (true/false), solution (true/false)
42. Click Save

43. Click See the Complete List of Triggers
44. Return to Storyline and create a variable stencilusertoken as instructed in step 1

45. Copy the code shown in step 3

46. Create a new JavaScript trigger on the slide Master to execute when the timeline starts, and paste the code you just copied
47. On the layer score locate the trigger that executes when the variable clabsAnswersResponseMessage changes (the trigger that you created earlier)
48. Add the following code to the end of the JavaScript code in this trigger
player.SetVar('stencilusertoken', '');
CloudSet('review', player.GetVar('review_text'));
CloudSet('response', player.GetVar('TextEntry'));

if (score.greeting.toUpperCase()==='Y') {
    CloudSet('greeting', true);
} else {
    CloudSet('greeting', false);
}

if (score.acknowledgment.toUpperCase()==='Y') {
    CloudSet('acknowledgment', true);
} else {
    CloudSet('acknowledgment', false);
}

if (score.solution.toUpperCase()==='Y') {
    CloudSet('solution', true);
} else {
    CloudSet('solution', false);
}
You are all set! You can now publish your project and test the scenario generation as well as response evaluation features powered by an AI large language model.